


New article
Recently updated
Managing processes in the library

Who is this article for?
Users managing processes within the library.
No elevated permissions are required.
A hierarchy of process areas and processes is maintained centrally in the Library, which is then available for mapping across the whole universe of auditable entities.
Understanding processes
Processes outline key activities within an organisation, organised into a hierarchy based on business needs and aligned with audit scope for annual planning. A typical structure includes:
- Finance
- Inventory Management
- Accounts Receivable
- Payroll
- Human Resources
- Recruitment
- Training
When creating the process hierarchy, remember that the lowest-level processes link to auditable entities, with audit coverage defined by these entities and their processes. Keep processes high-level, using sub-processes and risk register objectives for detailed documentation.
Processes may apply to multiple auditable entities; for example, Inventory Management occurs in many entities sharing similar risks and controls requiring consistent audits.
Each process must be assigned to a process area, enabling structured organisation and easy navigation via the data tree on the left of the screen.
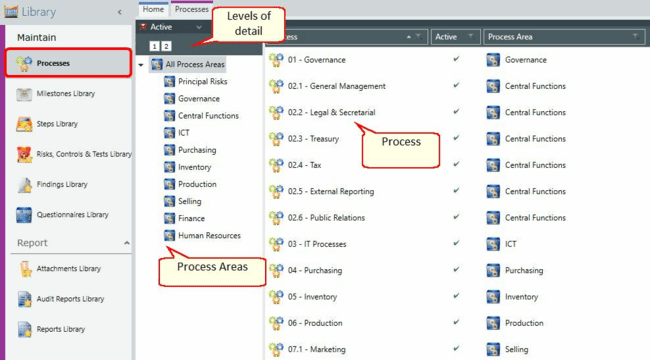
Creating a process area
To create a process area:
- Go to Library.
- Select Processes.
- Left click in the all process areas navigator to open the data tree window.
- Navigate through the process area hierarchy to the correct location.
- Select add from the ribbon, or right click and select add from the drop-down menu.
- Complete the process area properties:
- Parent - select where in the hierarchy you wish the process area to appear
- Order - add reference number
- Name (Mandatory) - select the name of the process area
- Colour - set the colour to represent the importance
- Description - add additional information here
- Active - activate/deactivate the process area (only active process areas will be available elsewhere in the system)
- Retired - cascades down to the child Processes respectively (this allows you to deactivate a larger part of the Org Structure in one go rather than having to do each child item individually)
- Select Save.
Use the re-order functionality to quickly change the order of your lists.
Note
The Set Scope (which is used for Audits, Incidents, Key Issues and Problems) will hide items which are Retired.
Deleting a process area
To delete a process area:
- Go to Library.
- Select Processes.
- Left-click in the process areas navigator to open the data tree window.
- Right-click the process area you wish to delete.
- Select Delete from menu.
Note
You can only delete a process area if the process area is inactive and is not in use with any org units.
Creating a process
To create a process:
- Go to Library.
- Select Processes.
- Right-click the process window.
- Select Add from the menu.
- Complete the process properties:
- Process area - assign the process to a process area
- Ref - give the process a reference
- Title - give the process a title (which will appear in the process area)
- Type - segmentation
- Description - add additional information here
- Active - select whether the process area is active or not
- Retired - allows Entity/Processes to remain Active but prevent new items (e.g. Actions) from being linked to them
- Exclude - ability to define dummy Entities/Processes that are excluded from Planning Periods, Audit Coverage and when setting Audit/Key Issue/Incident/Problem scope (these are still shown for mapping Entity/Processes, Client Universe, Action/Incident Tracker, Risk Exposure and Control Coverage screens)
- Weight
- Select Save.
Deleting a process
To delete a process:
- Go to Library.
- Select Processes.
- Right-click the process you wish to delete.
- Select Delete.
Note
You can only delete a process if the process is marked as inactive and is not in use with any org units.