


New article
Recently updated
Managing the risks, controls and tests library

Who is this article for?
Users managing risks, controls and tests library.
No elevated permissions are required.
The library administrator manages a library of objectives, risks, controls and test templates within the Risks, Controls and Tests Library, which can be copied into entities and audits using the Get from Library functionality.
Understanding the library structure
The library administrator manages objectives, risks, controls, and test templates. These include sample and action templates, accessible at the audit level.
Within an entity or audit, you can copy templates using Get from Library. Changes to library templates won't affect existing entity or audit records.
Five display modes simplify the view from the ribbon: Objective, Risk, Control, Test & Samples. You can switch modes anytime to reformat the data grid.
The library hierarchy is:
- An objective can have many risks
- A risk has one objective
- An objective can have many controls
- A risk can have many controls
- A control has one parent (objective or risk)
- Tests or attachments can be added to objectives, risks, or controls
- An objective can have many samples; each sample can link to many tests within it
- Document request templates can be attached to test templates
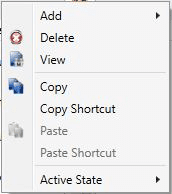
Adding an objective
To add an objective:
- Go to Library.
- Switch to Risk, Controls & Tests Library.
- Ensure Objective Templates is selected in the ribbon.
- Click Add.
- Select Add Objective Template.
- Complete the template properties:
- Process – select the parent process for the objective (an objective must always be attached to a process)
- Sub-Process – optionally select a sub-process (allowed values depend on the selected process)
- Library – optionally select from the Objective Library segmentations
- Departmental Library – departmental library assignment
- Ref – reference number
- Title – title for the objective template
- Description – rich text format
- Guidance – guidance to help users apply the objective within any entity or audit (rich text format)
- Category – assign the objective to a specific category to group objectives
- Default – upload by default
- Locked – tick to prevent the sample definition from being modified within an audit
- Audit Types – audit types assignment
- Post Audit – post audit work
- Active State – only live objectives will be available for selection when getting into any entity or audit
- Cross References – create a link to a record within the system that is of related interest
- Comments – comments on the objective work (rich text format)
- Click Save.
Adding a risk
To add a risk:
- Go to Library.
- Switch to Risk, Controls & Tests Library.
- Ensure Risk Templates is selected in the ribbon.
- Click Add.
- Select Add Risk Template.
- Complete the template properties:
- Objective – a risk must always attach to an objective
- Ref – reference number for the risk template
- Title – title for the risk template
- Description – description for the risk template (rich text format)
- Guidance – guidance can provide additional information needed to complete the work, expected results or auditing standards to which the work refers
- Category – assign the risk template to a specific category to group risks
- Type – assign the risk to a specific type to group risks
- Accounts – financial accounts relevant to this risk (by default, this list is drawn from accounts already linked to the risk's parent process)
- Assertions – claims to be tested in relation to this risk in the course of an audit
- Locked – tick to prevent the sample definition from being modified within an audit
- Audit Types – audit types assignment
- Active State (draft, live, closed) – only live risks will populate into any entity or audit
- Cross Reference – create a link to a record within the system that is of related interest
- Inherent and Residual scores if assessed within the library
- Comments – comments on the risk template (rich text format)
- Click Select Save.
Adding a control
To add a control:
- Go to Library.
- Switch to Risk, Controls & Tests Library.
- Ensure Control Templates is selected in the ribbon.
- Click Add.
- Select Add Control Template.
- Complete the template properties:
- Ref – reference number for the control
- Title – title for the control
- Description – description for the control (rich text format)
- Guidance – guidance can provide additional information needed to complete the work, expected results or auditing standards to which the work refers
- Principles – a pair of segmentations called Principles and Components
- Components – the list of components is a calculated field set to the distinct list of items covered by the selected principles
- Category – assign the control to a specific category to group controls
- Type – assign the control to a specific type to group controls
- Accounts – financial accounts relevant to this risk (by default, this list is drawn from accounts already linked to the risk's parent process)
- Assertions – claims to be tested in relation to this control in the course of an audit
- Importance – assign the control a specific importance to group controls
- Frequency – assign the control a specific frequency to group controls
- Locked – tick to prevent the sample definition from being modified within an audit
- Audit Types – audit types assignment
- Active State (draft, live, closed) – only live controls will populate into any entity or audit
- Cross References – create a link to a record within the system that is of related interest
- Score if assessed within the library
- Comments – comments on the control template (rich text format)
- Click Save.
Linked controls can also be added in the library.
Adding a test
To add a test:
- Go to Library.
- Switch to Risk, Controls & Tests Library.
- Ensure Test Templates is selected in the ribbon.
- Click Add.
- Select Add Test Template.
- Complete the template properties:
- Ref – reference number for the test
- Title – title for the test
- Description – description for the control (rich text format)
- Guidance – guidance can provide additional information needed to complete the work, expected results or auditing standards to which the work refers
- Type – assign the test to a specific type to group tests
- Result Set – set the possible outcomes of the test (these outcomes can be modified through Admin > Segmentation > Result Sets)
- Sample – a list of what samples the test is linked to
- Automatic – the test result is calculated automatically
- Locked – tick to prevent the sample definition from being modified within an audit
- Audit Types – audit types assignment
- Active State (draft, live, closed) – only live tests will populate into any entity or audit
- Cross References – create a link to a record within the system that is of related interest
- Result – result of the test carried out (the selectable results in this field are set by the selected result set)
- Result Description – additional result details
- Click Save.
Adding a library assessment
You can add risk and control assessments to your risk register, saving time by using predefined inherent or residual risk levels for central risks, regardless of location.
When users add objectives with related risks and controls to an entity or audit, they can include library assessments and modify them as needed.
To make an assessment:
- Right-click on the selected risk or control.
- Select Assessment.
- Select Make Assessment from the menu.
- Complete the property fields.
- Click Save.
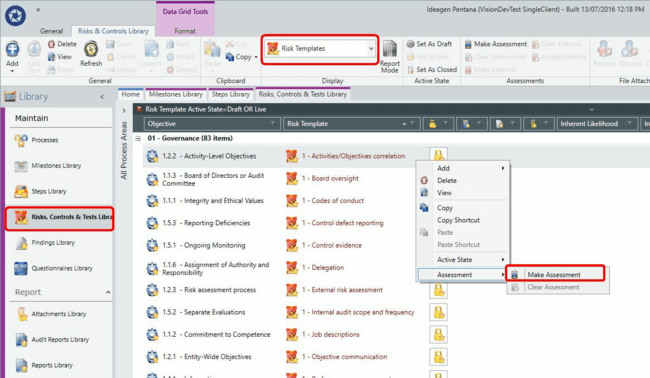
The current assessment will be displayed for the corresponding risk or control. All historic assessments will be stored and available for future reference.
Risk assessment

Control assessment
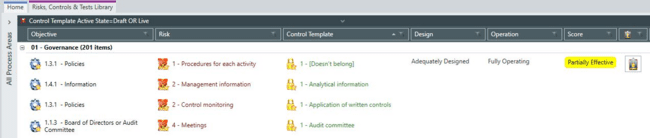
Use the Clear Assessment option (from the right-click menu) to remove any current assessments as required.
Adding a sample
To add a sample:
- Go to Library.
- Switch to Risk, Controls & Tests Library.
- Ensure Objective Templates is selected in the ribbon.
- Click Add.
- Select Sample Template.
- Complete the template properties:
- Ref – reference number for the sample
- Title – title for the sample
- Description – description for the sample (rich text format)
- Category – a segmentation value
- Result Set – linked to the result sets used whenever this sample is tested
- Size – integer indicating how many items it needs to contain
- Use Items – tick if the individual sample items (number based on size) will be generated within the system
- Locked – tick to prevent the sample definition from being modified within an audit
- For this new sample, you may select Set Tests from the right-click menu.
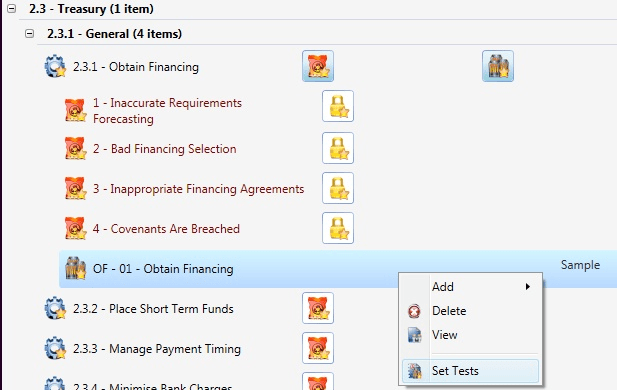
- You may then set the associated tests for your sample in the screen below.
Only tests associated directly to the objective are available for selection.
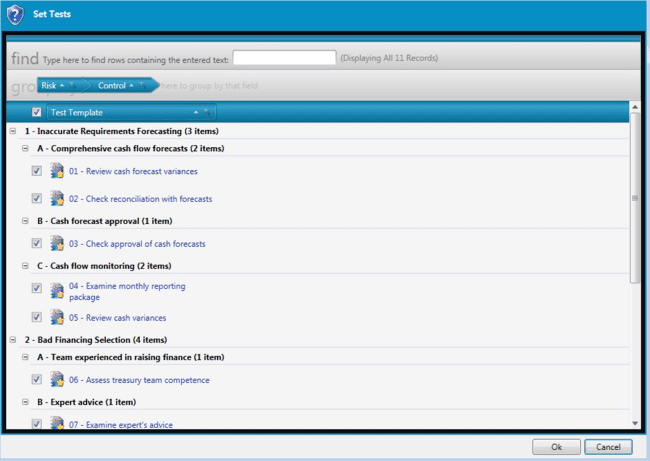
The sample template is then available to upload from the library when the objective is selected from within an audit. The library does not contain sample item templates or sample item test templates.
Adding attachments
To add an attachment:
- Right-click a template in the hierarchy.
- Select Add.
- Select Add Attachment.
- Use the dialogue window to select the attachment.
- Click OK.
You can add attachments from templates or files on your desktop. When added to the system, a copy is saved in the database, so changes won't affect the original file. Likewise, changes in the library or audit sections won't update the saved copy in templates.
To update the original file, open the attachment in the system and select Save As to overwrite it on your desktop.
Adding document requests
You can add document request templates to test templates in the library so that when an entity or audit is populated, the document requests are ready to be finalised.
To add a document request template:
- Right-click a test from the hierarchy.
- Select Add.
- Select Add Document Request Template.
- Complete the property pane to provide the detail of the document request.
- Click Save.